 SEDS is a small drawing and animation tool for the homebrew-enabled Nintendo DS. It is targeted at tiles and medium-sized sprites in 256 colours mode. You draw directly with the stylus on a 16x16 or 32x32 "grid" canvas that you can save in a "sprite table" shown on the right of the screen.
The whole user interface uses the concept of "aLt-click", which is touching the screen while holding the L shoulder button. That's how you can pick a color in the grid rather than painting a pixel, or save your work in the spritetable.
It also works by copying information. You don't directly edit the spritetable: you copy a sprite from the table on the grid, where you can edit it, and then copy it again back on the table (L+click), either where it comes from or on another slot.
I did my best to keep the user interface free of drag/drop or similar operations that would quickly damage your DS screen.
Check the sourceforge project for the latest version
Getting Started
- draw simply by touching the grid, select a new color by touching it in the palette on the left
- A = pencil tool, L+B = "horizontal flood fill"
- X/Y : automated "darken/lighten" brushes
- B = block tool (clik the two corners separately to fill it)
- L+B = horizontal bucket fill tool.
- L+R held together : show some more help
- START : file management
- SELECT : palette edition
Saving/resuming your work
SEDS manages 4 sprite sets, stored at the root of your media card, named SPRITEA.SPR, SPRITEB.SPR, SPRITEX.SPR and SPRITEY.SPR, which lets you quickly save your work by pressing START-R-(ABXY) and load it back with START-L-(ABXY). An additional backup level let you "archive" a spriteset in the /data/seds directory when you overwrite it with some new data.
.spr file format
.SPR files is a container format for the native content of the nintendo DS VRAM, which allows fast loading and saving, but is unknown by most PC-based software. It is, however, directly compatible with my own level editor.
If you're just a regular user, or if you haven't used SEDS often enough to find it is worth that much installation trouble, you still have an escape route: the brand new online conversion tool that can convert your art into a regular .png file with just the help of a regular web browser. Just select the picture with the "browse ..." button, click "post" and wait a couple of seconds to have the script doing the conversion and replying with the picture.
If you are a "power user", you may already have perl installed or find it not that complicated to install. In that case, you're suggested to install the Image::Imlib2 package as well so that you can run spr2png.pl conversion script directly on your machine and have your sprites converted in a more user-friendly format.
Enhanced Drawing Techniques
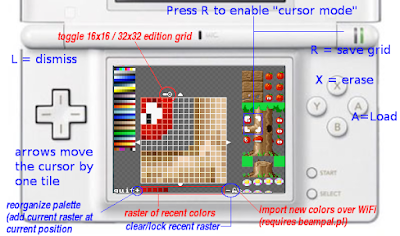
 You can save your edits to the spritesheet by L-clicking a position on the spritesheet, and start working on another tile/sprite by touching it on the spritesheet. Alternatively, you can use a cursor to save your work at any 8x8 tile within the sheet, which lets you build larger piece of art that you edit 32x32 or 16x16 pixels at a time.
It's also possible to sketch an object in a 32x32 grid, store it, then reload 16x16 parts and "zoom" them to size up and resize in another 32x32 grid to bring more detail to your artwork.
This cursor is activated by pressing "R" on the grid screen. See the picture above to know the additional controls for moving data between the grid and the spritesheet through that cursor.
A "quick palette" widget below the grid is automatically filled when you L-click the grid to pick some color. It can be used to reorganize your palette, or simply to capture some color from an existing tile (the "scan" button can ease up that task) and use them for another artwork.
Palette Edition
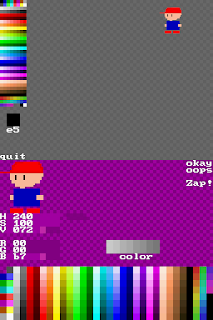
 Toggle to palette edition mode by pressing "SELECT" when you're on the grid window. Palette window shows your current sprite (as on grid) at zoom x2, the full 256 colors of your palette and sliders that let you adjust RGB or HSV value of any color.
 A simple 'touch' of any color (either on the palette, on the sprite or on the "raster" widget) selects this color as the "color under edit", and immediately updates RGB and HSV sliders. Touch and slide any slider to adjust one parameter, or L+tap the slider and use DPAD < and > direction for precision updates. Note that changes are immediately reflected to the palette. You can copy a color to another location by L-clicking any color on the palette.
You can also L-click the two edges of the "raster" widget to have a HSV raster rendered between those two extremes, and later pick any in-between by simply touching it. The blue-to-red raster depicted here has been built with the following actions:
- touch the cap
- L-click the right edge of the raster
- touch the "shirt"
- L-click the left edge of the raster
When you're done with your edits, click "okay" in the top-right corner of the screen to preview your changes on your current sprite sheet. Click "sure" (which replaced 'okay') again to commit these changes and go back to pixel art, or just keep hacking your colors until you're satisfied.
Clicking "oops" while "sure" is shown roll back to "okay/oops", but doesn't affect your edits. Clicking "oops" while "okay" is shown cancel your edits by re-loading the top-screen palette on the bottom screen.
The "Zap!" button can be used to kill all unused colours. For safety purpose, prefer a "named save" (START+R+A-Y) rather than a "regular save" (START+R+R) if you intentionally zap!ed some colors.
hint: fine-tuning of the colour palette can be tricky. L-click a slider to select it without actually changing its value and then use LEFT and RIGHT on the D-Pad to move to the next value.
note: latest version can store multiple palettes in one .spr file, and use it for alternate palette on sprites and background tiles. This however requires an update of your spr2png.pl script to properly handle those additional CMAP sections.
Colour Reduction and palette re-organisation
... more to come soon ...
More Info
- development progress on the blog
- open discussion on Pixelation forums and more generic bable on Pixeling on the DS
- download from sourceforge
And of course, don't miss the companion level editor, the under-construction animation editor and open-source game engine. Go create!
Feedback
SEDS' user interface lacks proper peer-testing by people who really do pixel art. I've set up a SEDS poll sheet for you to report how hard using the software currently is, and how you think it could be improved.
For the following actions: sketch on the grid, change the color, erase something, save a intermediate step before proceeding further, reverting to a previously saved state, reuse a previously picked colour, save your work, design your own colours, do an animation test, make a tile that tiles, switch the grid size (16x16 <-> 32x32)
A) you found which widget on screen was involved (5=immediately,..., 1=not at all, 0=you thought it was impossible)
B) you managed to do what you wanted (5=immediately, 1=you stopped trying)
C) after you succeeded to do it, the way the control work seemed (5=good idea, 3=you could learn it, 2=counter-intuitive, 1=didn't figured out how it worked)
D) describe how you'd proceed to do it again
E) describe how you'd rather have it working


 Vote for your favourite post


